
Overview
General
I’m installing RHV Cluster on 6 Lenovo Servers ( x3850 X6, 1TB RAM, 4 CPUs, 2x 280 GB HDD and attached SAN Storage). Servers have IMM (integrated management module II) in place.
- I’m using RHEL as Hypervisor-Host (not RHVH).
- I’m installing a self hosted engine.
- I’m sitting at a Windows 7 Workstation.
- As this is a PoC / Lab environment i disabled firewalls on all hosts. This is not recommended for production environments.
This will all be done manually due to lack of prerequisites (no Satellite Server, no prepared RHEL-images, no PXE server, etc.).
Information on Environment:
I put together all relevant Information here:
NTP-Servers: 10.15.232.65, 10.11.232.65, 10.14.232.65
DNS-Server (answering the example.com-Domain): 10.252.33.134 – set up only for this environment
NFS-Server: 10.252.33.135 – set up only for this environment
exporting: 10.252.33.135:/exports/data
To connect to the interent the following proxies exist:
Proxy: 10.15.62.146:8080
Networks and its VLANs:
| HW-PROV-… | 3001 |
| CLD-MGMT- | 3002 |
| IMG-STREAM-… | 3003 |
| OSP-EXT-… | 3004 |
| Storage Mgmt | 3005 |
| Storage-Data-… | 3006 |
| OSP-API-… | 3007 |
| OSP-Tenant-… | 3008 |
| RHOSP-PROVIDER-… | 3009 |
| OCP-HMC-… | 3010 |
| OCP-ATEME-… | 3011 |
| OC-OCP-CISCO-… | 3012 |
| RHEV-LIVEM-… | 3013 |
All shall be run over a 10 GBit LACP bond and will be provided as “tagged VLAN”. The RHV Hypervisor Hosts will only get an IP adress on the LIVEMigration network as it is for RHV Live migration.
The Managment Network shall be on the 1 GBit LACP bond and is “untagged”.
Doing
Prepreparation of surrounding systems
preparation on the Windows 7 Workstation
As our DNS-Server will only be asked from inside the environment i added the host-names to the local hossts file of the Windows workstation. This is needed as rhvm-WebUi needs to be connected via hostname.
edit c:\windows\system32\drivers\etc\hosts

10.252.182.141 lab-1.example.com lab-1
10.252.182.142 lab-2.example.com lab-2
10.252.182.143 lab-3.example.com lab-3
10.252.182.144 lab-4.example.com lab-4
10.252.182.145 lab-5.example.com lab-5
10.252.182.146 lab-6.example.com lab-6
10.252.182.129 rhvm.example.com rhvm
Preparing NFS Server (as source of ISO Domain)
Hint: We first tried with an Ubuntu based NFS-Server, but this causes issues later and is not recommended.
configured the NFS-Server as follows:
[root@nfs-1 ~]# yum install nfs-utils libnfsidmap
[root@nfs-1 ~]# groupadd kvm -g 36
[root@nfs-1 ~]# useradd vdsm -u 36 -g 36
[root@nfs-1 ~]# mkdir -p /exports/data/
[root@nfs-1 ~]# mkdir -p /exports/export/
[root@nfs-1 ~]# chown -R 36:36 /exports/*/
[root@nfs-1 ~]# chmod 0755 /exports/*/
[root@nfs-1 ~]# vi /etc/exports
/exports/data 10.252.182.128/255.255.255.128(rw)
/exports/export 10.252.182.128/255.255.255.128(rw)
[root@nfs-1 ~]# systemctl enable rpcbind
[root@nfs-1 ~]# systemctl enable nfs-server
Created symlink from /etc/systemd/system/multi-user.target.wants/nfs-server.service to /usr/lib/systemd/system/nfs-server.service.
[root@nfs-1 ~]# systemctl start rpcbind
[root@nfs-1 ~]# systemctl start nfs-server
[root@nfs-1 ~]# systemctl start rpc-statd
[root@nfs-1 ~]# systemctl start nfs-idmapd
[root@nfs-1 ~]# showmount -e
Export list for nfs-1.example.com:
/exports/export 10.252.182.128/255.255.255.128
/exports/data 10.252.182.128/255.255.255.128
[root@nfs-1 ~]# systemctl stop firewalld
[root@nfs-1 ~]# systemctl disable firewalld
Removed symlink /etc/systemd/system/dbus-org.fedoraproject.FirewallD1.service.
Removed symlink /etc/systemd/system/basic.target.wants/firewalld.service.
Preparing DNS Server
I’ve also set up a DNS Server being master for
example.com.
182.252.10.in-addr.arpa.
and forwarding everything else to some official nameservers.
Preparing the Host & OS
[doing this on all 6 hosts seperately]
Using Internet Explorer (as Chrome does not get the console session opened) to conenct to the IMM and open a remote console.
I use “ActiveX Client” as Remote Console, as other oprtions did not work or did not deliver the right options (mounting local iso-image).
Befor powering on i connected the virtual media (first activate then “connect virtual Media”) to connect local residing RHEL ISO-Image as DVD to the host.
I started to install RHEL and configured the local RAID 1 yust before configuring destination of installation. Doing the RAID config erlier ran into IMM exceptions..
Installing RHEL
On some of the hosts i needed to press F12 to select Boot-Device (and then selected my local DVD).
Installed RHEL interactively, with the following parameters:
Language: English (United States)
Keyboard: English (could have changed this to german for the console).
I configured Networking:
Hostname: lab-1.example.com (fqdn) (lab-2, … accordingly)
Network:
- enable the correct network interface
- configured as static
- ip-address, netmask, router, dns-servers, dns-search domain
eno24
DNS-Domain: example.com
I configured timezone and ntp-servers (upper right corner)
timezone: Berlin
NTP: 3 localy running NTP servers (as defined above)
Before configuring the local disks as installation destination i configured the RAID via IMM
Configuring RAID on IMM
Hint: You would think this might be the first thing todo before starting OS installation. At least on the Lenovo servers a running os was needed. Trying this beforehand I was not able to remove the JBOD-configuration and ran on an error.
Server Management > Local Storage > Tab “Storage RAID configuration > Create Volume
I first needed to wipe the JBOD konfiguration and then created a RAID 1 volume group and added one volume into this volume group. The volume offerd quite some options. But i kept the defaults:
- Read Policy: No Read Ahead
- Write Policy: Write Through
- IO Policy Direct I/O
- Access Policy Read Write
- disk cache Policy unchange
- initialization status: fast
FINISH
I could then continue with the RHEL installation:
Continue with RHEL installation
After refreshing the recognized disk the installation frontend showed one local disk (the volume i just created). I configured the disk layout manually as follows:
configure manually => later on “create automatically” => then change
I changed /home to 1 GB, added /tmp, / var and increased size of swap. This ist the result:
/boot 1 GB
/boot/efi 200 MB
/ 50 GB
/home 1 GB
/tmp 10 GB
/var 50 GB
swap 100 GB
I left the installation type default: minimal installation.
After starting, i set the root password. I did not addd a user.
System needed a reboot.
preparation work on the hosts OS
Added ssh-connection from lab-1 to other lab-X Servers
[root@lab-1 ~]# ssh-keygen
[root@lab-1 ~]# for i in 1 2 3 4 5 6; do ssh-copy-id root@lab-$i.example.com; done
adopted /etc/hosts
[root@lab-1 ~]# cat /etc/hosts
127.0.0.1 localhost localhost.localdomain localhost4 localhost4.localdomain4
::1 localhost localhost.localdomain localhost6 localhost6.localdomain6
10.252.182.141 lab-1.example.com lab-1
10.252.182.142 lab-2.example.com lab-2
10.252.182.143 lab-3.example.com lab-3
10.252.182.144 lab-4.example.com lab-4
10.252.182.145 lab-5.example.com lab-5
10.252.182.146 lab-6.example.com lab-6
10.252.182.129 rhvm.example.com rhvm
Checked Bios-Config:
[root@lab-1 ~]# grep -E 'svm|vmx' /proc/cpuinfo | grep nx
flags : fpu vme de pse tsc msr pae mce cx8 apic sep mtrr pge mca cmov pat pse36 clflush dts acpi mmx fxsr sse sse2 ss ht tm pbe syscall nx pdpe1gb rdtscp lm constant_tsc arch_perfmon pebs bts rep_good nopl xtopology nonstop_tsc aperfmperf eagerfpu pni pclmulqdq dtes64 monitor ds_cpl vmx smx est tm2 ssse3 fma cx16 xtpr pdcm pcid dca sse4_1 sse4_2 x2apic movbe popcnt tsc_deadline_timer aes xsave avx f16c rdrand lahf_lm abm 3dnowprefetch epb cat_l3 cdp_l3 intel_pt tpr_shadow vnmi flexpriority ept vpid fsgsbase tsc_adjust bmi1 hle avx2 smep bmi2 erms invpcid rtm cqm rdt_a rdseed adx smap xsaveopt cqm_llc cqm_occup_llc cqm_mbm_total cqm_mbm_local dtherm ida arat pln pts
....
You must get a result from this grep on all 6 hosts. Otherwise change your bios settings.
Subscribing the hosts and providing needed SW repositories
Testing the interent connetion via proxy:
[ tested on one host only]
[root@lab-1 ~]# export http_proxy=http://10.15.62.146:8080/
[root@lab-1 ~]# export https_proxy=http://10.15.62.146:8080/
[root@lab-1 ~]# curl www.redhat.com
If curl is working you can start to your subscription work:
[run on all 6 hosts]
[root@lab-1 ~]# subscription-manager config --server.proxy_hostname=10.15.62.146 --server.proxy_port=8080
searching the pool id only on one host:
[run on one host]
[root@lab-1 ~]# subscription-manager list --available
attaching pool id to all 6 hosts
[run on all 6 hosts]
[root@lab-1 ~]# subscription-manager attach --pool=poolid
configuring repos as needed
[run on all 6 hosts]
[root@lab-1 ~]# subscription-manager repos --disable=*
[root@lab-1 ~]# subscription-manager repos --enable=rhel-7-server-rpms --enable=rhel-7-server-rhv-4-mgmt-agent-rpms
[root@lab-1 ~]# yum update -y
[root@lab-1 ~]# yum install -y ovirt-hosted-engine-setup rhvm-appliance  screen
I’ve also installed and configured “Cockpit” on all 6 hosts:
[run on all 6 hosts]
[root@lab-1 ~]# yum install -y cockpit-ovirt-dashboard
[root@lab-1 ~]# systemctl enable cockpit.socket
[root@lab-1 ~]# systemctl start cockpit.socket
You can log in to the Cockpit user interface at https://HostFQDNorIP:9090.
Only for PoC / Lab environment….
[run on all 6 hosts]
[root@lab-1 ~]# systemctl stop firewalld
[root@lab-1 ~]# systemctl disable firewalld
configuring FC multipathing
See which scsi devices are available:
[run on all 6 hosts]
[root@lab-1 ~]# lsscsi
[0:0:0:0] cd/dvd IMM Virtual Media 0325 /dev/sr0
[1:2:0:0] disk IBM ServeRAID M5210 4.66 /dev/sda
Only local devices are found.
This maybe due to the fact that the FC Luns where not there when i started the whole process. Now they should be available. I need to rescan the fc.
Hint: The RHEL-provided script “rescan-scsi-bus.sh” did not work on my environment.
So we do bus rescanning manually:
See which hostbus adapters are there on our host:
[run on all 6 hosts]
[root@lab-1 ~]# ls -l /sys/class/fc_host/
total 0
lrwxrwxrwx. 1 root root 0 Oct 25 12:08 host2 -> ../../devices/pci0000:c0/0000:c0:03.0/0000:d5:00.0/host2/fc_host/host2
lrwxrwxrwx. 1 root root 0 Oct 25 12:08 host3 -> ../../devices/pci0000:c0/0000:c0:03.0/0000:d5:00.1/host3/fc_host/host3
Tell these adapters to rescan:
[run on all 6 hosts]
[root@lab-1 ~]# echo "1" > /sys/class/fc_host/host2/issue_lip
[root@lab-1 ~]# echo "1" > /sys/class/fc_host/host3/issue_lip
Note: On other Hosts the hostbus adapters where named differently.
After detecting the scsi devices. Things might look like this:
[root@lab-1 ~]# lsscsi
[0:2:0:0] disk IBM ServeRAID M5210 4.66 /dev/sda
[1:0:3:0] disk IBM 2145 0000 /dev/sdb
[1:0:3:1] disk IBM 2145 0000 /dev/sdc
[1:0:3:2] disk IBM 2145 0000 /dev/sdd
[1:0:3:3] disk IBM 2145 0000 /dev/sde
[1:0:4:0] disk IBM 2145 0000 /dev/sdf
[1:0:4:1] disk IBM 2145 0000 /dev/sdg
[1:0:4:2] disk IBM 2145 0000 /dev/sdh
[1:0:4:3] disk IBM 2145 0000 /dev/sdi
[1:0:5:0] disk IBM 2145 0000 /dev/sdj
[1:0:5:1] disk IBM 2145 0000 /dev/sdl
....
[3:0:0:0] cd/dvd IMM Virtual Media 0325 /dev/sr0
I now configure multipathing:
[run on all 6 hosts]
[root@lab-1 ~]# mpathconf --enable --with_multipathd y --user_friendly_names y --with_module y
[root@lab-1 ~]# systemctl start multipathd
[root@lab-1 ~]# systemctl enable multipathd
Installing RHV
Installing Self Hosted Engine on first Host
You start from plain RHEL-Installation (with the repositories and rpms available as mentioned above). While setting up the self hosted engine the host gets setup as well.
It is recommended to use screen when using ssh network connection :
[run on one host only]
[root@lab-1 ~]# screen
[root@lab-1 ~]# hosted-engine --deploy

continue => yes
Log file: /var/log/ovirt-hosted-engine-setup/ovirt-hosted-engine-setup-20171025191354-nio3m5.log
storage: fc
luns: 250 GiB
configure iptables => yes
please indicate NIC to set ovirtmgmt bridge on => eno24
use RHV-M-Appliance (not an ova file)
use VNC (not SPICE)
use cloud-init => yes
generate it
Do you want to enable ssh access for the root user (yes, no, without-password) [yes]:
Please specify the size of the VM disk in GB: [58]:
Please specify the memory size of the VM in MB (Defaults to appliance OVF value): [16384]:
The following CPU types are supported by this host:
– model_Broadwell: Intel Broadwell Family
– model_Broadwell-noTSX: Intel Broadwell-noTSX Family
– model_Haswell: Intel Haswell Family
– model_Haswell-noTSX: Intel Haswell-noTSX Family
– model_SandyBridge: Intel SandyBridge Family
– model_Westmere: Intel Westmere Family
– model_Nehalem: Intel Nehalem Family
– model_Penryn: Intel Penryn Family
– model_Conroe: Intel Conroe Family
Please specify the CPU type to be used by the VM [model_Broadwell]:
Please specify the number of virtual CPUs for the VM (Defaults to appliance OVF value): [4]:
You may specify a unicast MAC address for the VM or accept a randomly generated default [00:16:3e:1d:cd:60]:
How should the engine VM network be configured (DHCP, Static)[DHCP]? static
Please enter the IP address to be used for the engine VM [10.252.182.129]:
[ INFO ] The engine VM will be configured to use 10.252.182.129/25
Please provide a comma-separated list (max 3) of IP addresses of domain name servers for the engine VM
Engine VM DNS (leave it empty to skip) [10.252.33.134]:
Add lines for the appliance itself and for this host to /etc/hosts on the engine VM?
Note: ensuring that this host could resolve the engine VM hostname is still up to you
(Yes, No)[No] yes
–== HOSTED ENGINE CONFIGURATION ==–
Enter engine admin password:
Confirm engine admin password:
Please provide the name of the SMTP server through which we will send notifications [localhost]:
Please provide the TCP port number of the SMTP server [25]:
Please provide the email address from which notifications will be sent [root@localhost]:
Please provide a comma-separated list of email addresses which will get notifications [root@localhost]:
[ INFO ] Stage: Setup validation
–== CONFIGURATION PREVIEW ==–
Bridge interface : eno24
Engine FQDN : rhvm.example.com
Bridge name : ovirtmgmt
Host address : lab-1.example.com
SSH daemon port : 22
Firewall manager : iptables
Gateway address : 10.252.182.254
Storage Domain type : fc
LUN ID : 36005076801808657d800000000000103
Image size GB : 58
Host ID : 1
Console type : vnc
Memory size MB : 16384
MAC address : 00:16:3e:1d:cd:60
Number of CPUs : 4
OVF archive (for disk boot) : /usr/share/ovirt-engine-appliance/rhvm-appliance-4.1.20170914.0-1.el7.ova
Appliance version : 4.1.20170914.0-1.el7
Restart engine VM after engine-setup: True
Engine VM timezone : Europe/Berlin
CPU Type : model_Broadwell
Please confirm installation settings (Yes, No)[Yes]:
Generating answer file ‘/var/lib/ovirt-hosted-engine-setup/answers/answers-20171025193612.conf’
[ INFO ] Generating answer file ‘/etc/ovirt-hosted-engine/answers.conf’
[ INFO ] Stage: Pre-termination
Configuring RHV from RHV-Manager Web UI
Loging into https://rhvm.example.com/
Changinmg the Web UI language into US English:
Before clicking on a certain portal (the Admin portal in our case), i can choose the language on the lower left drop box. This defaults to the browser setting but I prefer Englisch to avoid translation issues.
Adding second Host to Datacenter
navigating to
System > Data Centers > Default > Clusters > Default > hosts
and press “New”
fill out the “General” Tab
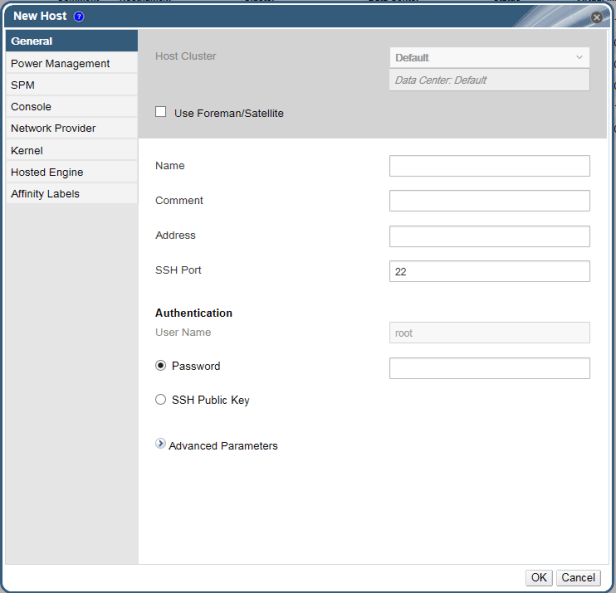
I’ve used the password, as i where to lazy to fix the ssh-key issues i faced.
I configured “Power Management” in the coresponding Tab:
- Enable Power Management
- Kdump integration
- Add Power Management Agent
- Adresse of MMI interace
- Credentials as configured on the board (username and password)
- Type: ipmilan
pressing “Test” and geting a “Test successful” message lets me press “OK”.
Important:
You need to navigate to the “Hosted Engine” Tab and select “Deploy” there. If you don’t you will not able to migrate the RHV-Manager VM (aka “Engine VM”) to this host. There is no way to mend this exept of deleting the host and creating it again.
I added the other remaing 4 hosts in the same manner.
On the initial Host we also needed to:
- configure power management (as described above)
configuring the storage Domains
With the hosted engine installation you configured RHVM, an underlying RHV-Hypervisor and a storage domain in which the RHVM image resides. But you do not see the storage domain within the RHVM Web UI.
You make the allready existing storage domain visible first:
hosted_engine
Navigate towards
System > Data Centers > Default >Storage
You should not see any storage domain yet. Press “Import Domain”
Select Storage Type “Fibre Channel” and select the “hosted_storage” domain
The hosted_domain storage domain should be soley for the hosted engine. Do not add any other hosts on this domain for safty reasons.
VMs
I created a second Fibre Channel storage domain called “VMs” and selected the largest LUN i got offered from the UI.
Hint: The UI only offers LUNs available to all hosts in the cluster.
ISO
To provide ISO-Images, which you can mount into a VM, you need to hava an ISO-Domain, which needs to be NFS or Gluster Filesystem.
I use the NFS-Share created above,
- defined the “Domain Function” as “ISO”,
- the Name as “ISO”,
- left the”Host to use” untouched
- and provided the “Export Path”.
Hint:
First i tried with some wired NFS-Server (Ubuntu in this case) which introduced issues. RHV was not able to create the storage domain but had leftovers of this Storage Domain in it’s data base. So please use a well known NFS-product or use a RHEL Server as NFS Host.
Keith Tenzers Blog describes under the Headline “Troubleshooting” very steight forward how to get rid of half baked storage Domains again. – Thank you Keith!
Subscribe rhvm as well
[run on rhvm]
[root@rhvm ~]# subscription-manager config --server.proxy_hostname=10.15.62.146 --server.proxy_port=8080
searching the pool id:
[run on rhvm]
[root@rhvm ~]# subscription-manager list --available
attaching pool id to the node
[run on rhvm]
[root@rhvm ~]# subscription-manager attach --pool=poolid
configuring repos as needed
[run on rhvm]
[root@rhvm ~]# subscription-manager repos --disable=*
[root@rhvm ~]# subscription-manager repos --enable=rhel-7-server-rpms --enable=rhel-7-server-supplementary-rpms --enable=rhel-7-server-rhv-4.1-rpms --enable=rhel-7-server-rhv-4-tools-rpms --enable=jb-eap-7-for-rhel-7-server-rpms
Update des RHVM
To update RHVM, you need to switch the whole RHV cluster in “global maintanance”. I then run engine-setup within the rhvm- VM to capture outstanding updates.
Hint: Documentation and my experiance do not fit 100%. So please consult the documentation for this step on how things should be done corretly.
[root@lab-1 ~]# hosted-engine --set-maintenance --mode=global
[run on rhvm]
[root@rhvm ~]# engine-setup
 --== CONFIGURATION PREVIEW ==--

Default SAN wipe after delete : False
 Firewall manager : firewalld
 Update Firewall : True
 Host FQDN : rhvm.example.com
 Engine database secured connection : False
 Engine database user name : engine
 Engine database name : engine
 Engine database host : localhost
 Engine database port : 5432
 Engine database host name validation : False
 Engine installation : True
 PKI organization : example.com
 DWH installation : True
 DWH database secured connection : False
 DWH database host : localhost
 DWH database user name : ovirt_engine_history
 DWH database name : ovirt_engine_history
 Backup DWH database : True
 DWH database port : 5432
 DWH database host name validation : False
 Configure Image I/O Proxy : True
 Configure VMConsole Proxy : True
 Configure WebSocket Proxy : True
run the update
[run on rhvm]
[root@rhvm ~]# yum update -y
[root@rhvm ~]# init 6
Funny enough, the Engine VM did not restart but just stopped. Therefore i needed to start the Engine again myself:
[run on one host]
[root@lab-1 ~]# hosted-engine --vm-start
Ensure the setup of the engine is aware of the new SW:
[run on rhvm]
[root@rhvm ~]# engine-setup
Stopping Firewall on RHVM
As i’m in a Lab / PoC environment i stopped the Firewall
[root@rhvm ~]# systemctl stop firewalld
[root@rhvm ~]# systemctl disable firewalld
Removed symlink /etc/systemd/system/multi-user.target.wants/firewalld.service.
Removed symlink /etc/systemd/system/dbus-org.fedoraproject.FirewallD1.service.
Configuring RHV Networking
I set up the networking completely in the RHV Web UI. Don’t use Network Manager nor start editing ifcfg-* scripts.
Define the VLANs
The VLANs are predefined on the switch outside of RHV. You need to define them within RHV as well so you can connect your VMs directly to the needed VLANs.
Navigate towards:
System > Data Centers > Default > Networks
Pressing “New”
in the “General” Tag
- Provide a predefined name (best to call it like it is called in on the switch)
- Enable VLAN tagging
- Enable “VM network” (Except for the RHEV-LIVEM network)
in the “Cluster” Tag
- select “Attach”
- deselect “Required”
You want your host be up and running, even when the network is not available for any reason. Therefor you deselected “required”.
You repete this step for all VLANs you might need on any of the future VMs.
Bonding of the interfaces
On each host we need to create the correct network configuration as well:
Navigate towards:
System > Data Centers > Default > Clusters > Default > Hosts
select one Host
assure to select the “Hosts” Tab on the upper tab bench.
select “Network Interfaces” on the lower Tab bench .
Press “Setup Host Networks”
This Menue works via “drag and drop”. So drag eno25 ontop of eno24 to create a bond. Define an appropriate name for your bond interface (e.g. bond0).
The bond will have Mode 4 (LACP) as default. Work with the network engineer to get this up and running.
Check the status on the command line:
[root@lab-1 ~]# for i in eno24 eno25 bond0 ; do ip a s $i; done
2: eno24: <BROADCAST,MULTICAST,SLAVE,UP,LOWER_UP> mtu 1500 qdisc mq master bond0 state UP qlen 1000
 link/ether e0:4f:43:07:89:18 brd ff:ff:ff:ff:ff:ff
3: eno25: <BROADCAST,MULTICAST,SLAVE,UP,LOWER_UP> mtu 1500 qdisc mq master bond0 state UP qlen 1000
 link/ether e0:4f:43:07:89:18 brd ff:ff:ff:ff:ff:ff
84: bond0: <BROADCAST,MULTICAST,MASTER,UP,LOWER_UP> mtu 1500 qdisc noqueue master ovirtmgmt state UP qlen 1000
 link/ether e0:4f:43:07:89:18 brd ff:ff:ff:ff:ff:ff
As some interfaces where down before i focused to see “LOWER_UP” on the master as well as on both slave interfaces.
Looking at the bonding status:
[root@lab-1 ~]# cat /proc/net/bonding/bond0
Ethernet Channel Bonding Driver: v3.7.1 (April 27, 2011)

Bonding Mode: IEEE 802.3ad Dynamic link aggregation
Transmit Hash Policy: layer2+3 (2)
MII Status: up
MII Polling Interval (ms): 100
Up Delay (ms): 0
Down Delay (ms): 0

802.3ad info
LACP rate: slow
Min links: 0
Aggregator selection policy (ad_select): stable
System priority: 65535
System MAC address: e0:4f:43:07:89:18
Active Aggregator Info:
 Aggregator ID: 3
 Number of ports: 2
 Actor Key: 9
 Partner Key: 32825
 Partner Mac Address: 00:23:04:ee:be:66

Slave Interface: eno24
MII Status: up
Speed: 1000 Mbps
Duplex: full
Link Failure Count: 2
Permanent HW addr: e0:4f:43:07:89:18
Slave queue ID: 0
Aggregator ID: 3
Actor Churn State: none
Partner Churn State: none
Actor Churned Count: 0
Partner Churned Count: 1
details actor lacp pdu:
 system priority: 65535
 system mac address: e0:4f:43:07:89:18
 port key: 9
 port priority: 255
 port number: 1
 port state: 61
details partner lacp pdu:
 system priority: 32667
 system mac address: 00:23:04:ee:be:66
 oper key: 32825
 port priority: 32768
 port number: 37895
 port state: 61

Slave Interface: eno25
MII Status: up
Speed: 1000 Mbps
Duplex: full
Link Failure Count: 1
Permanent HW addr: e0:4f:43:07:89:19
Slave queue ID: 0
Aggregator ID: 3
Actor Churn State: none
Partner Churn State: none
Actor Churned Count: 1
Partner Churned Count: 1
details actor lacp pdu:
 system priority: 65535
 system mac address: e0:4f:43:07:89:18
 port key: 9
 port priority: 255
 port number: 2
 port state: 61
details partner lacp pdu:
 system priority: 32667
 system mac address: 00:23:04:ee:be:66
 oper key: 32825
 port priority: 32768
 port number: 21511
 port state: 61
For the bond itself you see:
- Bonding Mode: IEEE 802.3ad Dynamic link aggregation
- MII Status: up
This tells you, that you realy configured LACP (which is 802.3ad) and your bond is up.
You see both interfaces up “MII Status: up” and you see “… Chrun State: none” on both interfaces. Chrun state can be
- chruned – this means something is wrong
- monitorring – this means we are about to find out which state we have
- none – no chrunning, which is the good state.
So having Chrun State: none on both interfaces on the actor and the partner side is perfect. Anything else means non-healthy status.
Adding the VLANs to the host
I did the same bonding for the 10 GBit interfaces (other device names though). Still being in the “Setup Host Networks” Window you drag all the available VLANs onto your second bond (which i named bond1).
For the live migration network i also defined a fixed IP-Address for each host. I clicked on the pen (right hand side of the network box) and
- disabled IPv6
- set IPv4 Boot protocol to Static
- defined a unique ip-adress
- provided the correct network mask
- provided no gateway, as i do not need to route anywhere through this network
Functionality Check
Having configured networking on all hosts i logged in to one host and pinged the others over live migration network.
[root@lab-1 ~]# for i in 1 2 3 4 5 6; do ping -c 1 192.168.1.$i; done
PING 192.168.1.1 (192.168.1.1) 56(84) bytes of data.
64 bytes from 192.168.1.1: icmp_seq=1 ttl=64 time=0.049 ms

--- 192.168.1.1 ping statistics ---
1 packets transmitted, 1 received, 0% packet loss, time 0ms
rtt min/avg/max/mdev = 0.049/0.049/0.049/0.000 ms
PING 192.168.1.2 (192.168.1.2) 56(84) bytes of data.
64 bytes from 192.168.1.2: icmp_seq=1 ttl=64 time=0.192 ms

--- 192.168.1.2 ping statistics ---
1 packets transmitted, 1 received, 0% packet loss, time 0ms
rtt min/avg/max/mdev = 0.192/0.192/0.192/0.000 ms
PING 192.168.1.3 (192.168.1.3) 56(84) bytes of data.
64 bytes from 192.168.1.3: icmp_seq=1 ttl=64 time=0.162 ms

--- 192.168.1.3 ping statistics ---
1 packets transmitted, 1 received, 0% packet loss, time 0ms
rtt min/avg/max/mdev = 0.162/0.162/0.162/0.000 ms
PING 192.168.1.4 (192.168.1.4) 56(84) bytes of data.
64 bytes from 192.168.1.4: icmp_seq=1 ttl=64 time=0.189 ms

--- 192.168.1.4 ping statistics ---
1 packets transmitted, 1 received, 0% packet loss, time 0ms
rtt min/avg/max/mdev = 0.189/0.189/0.189/0.000 ms
PING 192.168.1.5 (192.168.1.5) 56(84) bytes of data.
64 bytes from 192.168.1.5: icmp_seq=1 ttl=64 time=0.177 ms

--- 192.168.1.5 ping statistics ---
1 packets transmitted, 1 received, 0% packet loss, time 0ms
rtt min/avg/max/mdev = 0.177/0.177/0.177/0.000 ms
PING 192.168.1.6 (192.168.1.6) 56(84) bytes of data.
64 bytes from 192.168.1.6: icmp_seq=1 ttl=64 time=0.160 ms

--- 192.168.1.6 ping statistics ---
1 packets transmitted, 1 received, 0% packet loss, time 0ms
rtt min/avg/max/mdev = 0.160/0.160/0.160/0.000 ms
Switching “Live Migration” Service Network
We need to tell RHV to use the intended Network for live migration and therfore switch tle live migration functionality to the “Live Migration Network”
Navigate towards:
System > Data Centers > Default > Clusters
In the upper Tab Bench you only have one Tab “Clusters”.
On the lower Tab Bench select “Logical Networks” sub-tab.
Click the “Manage Networks” button.
Check the “Migration Network” radio button next to the Live Migration network we want to use for live migration.
Doing a full backup
As recommended i did a full backup of rhvm after having configured everything the way i wanted it:
[root@rhvm ~]# engine-backup --scope=all --mode=backup --file=/backup_$(date +%Y%M%d).backup --log=/backup_$(date +%Y%M%d).log
Preparing for your VMs
Providing ISO images
I have some iso-images on my (windows) desktop, which i’d like to provide as iso-images for installations.
I use winscp (found on the desktop) to copy the iso-files to rhvm.example.com:/root/iso_images
i then use the special uploader to upload the isos into the ISO storage domain.
[root@rhvm ~]# ovirt-iso-uploader list
Please provide the REST API password for the admin@internal oVirt Engine user (CTRL+D to abort):
ISO Storage Domain Name | ISO Domain Status
ISO | ok
[root@rhvm ~]# ovirt-iso-uploader upload -i ISO /root/iso_images/rhel-server-7.4-x86_64-dvd.iso
Please provide the REST API password for the admin@internal oVirt Engine user (CTRL+D to abort):
Uploading, please wait...
INFO: Start uploading /root/iso_images/rhel-server-7.4-x86_64-dvd.iso
Uploading: [########################################] 100%
INFO: /root/iso_images/rhel-server-7.4-x86_64-dvd.iso uploaded successfully
[root@rhvm ~]# ovirt-iso-uploader upload -i ISO /root/iso_images/RHEV-toolsSetup_4.1_7.iso
Please provide the REST API password for the admin@internal oVirt Engine user (CTRL+D to abort):
Uploading, please wait...
INFO: Start uploading /root/iso_images/RHEV-toolsSetup_4.1_7.iso
Uploading: [########################################] 100%
INFO: /root/iso_images/RHEV-toolsSetup_4.1_7.iso uploaded successfully
[root@rhvm ~]# engine-iso-uploader --iso-domain=ISO upload /usr/share/virtio-win/virtio-win.iso /usr/share/virtio-win/virtio-win_x86.vfd /usr/share/virtio-win/virtio-win_amd64.vfd /usr/share/rhev-guest-tools-iso/rhev-tools-setup.iso
Please provide the REST API password for the admin@internal oVirt Engine user (CTRL+D to abort):
Uploading, please wait...
INFO: Start uploading /usr/share/virtio-win/virtio-win.iso
Uploading: [########################################] 100%
INFO: /usr/share/virtio-win/virtio-win.iso uploaded successfully
INFO: Start uploading /usr/share/virtio-win/virtio-win_x86.vfd
Uploading: [########################################] 100%
INFO: /usr/share/virtio-win/virtio-win_x86.vfd uploaded successfully
INFO: Start uploading /usr/share/virtio-win/virtio-win_amd64.vfd
Uploading: [########################################] 100%
INFO: /usr/share/virtio-win/virtio-win_amd64.vfd uploaded successfully
INFO: Start uploading /usr/share/rhev-guest-tools-iso/rhev-tools-setup.iso
Uploading: [########################################] 100%
INFO: /usr/share/rhev-guest-tools-iso/rhev-tools-setup.iso uploaded successfully
Enabeling the console of VMs to be viewed on the windows workstation
From https://rhvm.example.com/ovirt-engine/
Click “Console client ressources” and click on “Virt Viewer for 64-bit Windows”. This tries to download “virt-viewer-64.msi”. Run this on you local windows workstation (need admin priviledges).
If i then click on the console -icon of a booted vm a console.vv file is downloaded and executed. If Windows does not know how to execute the console.vv virt-viewer is not installed properly. See https://access.redhat.com/solutions/448883 for help.
Building first VM and testing it
In the RHVM WebUI navigate to
System > Data-Centers > Default > Clusters > Default > VMs
press “New VM”
in Tab “General” choose
OS: Linux
Type: Small
Name: allg1
Images -> press “create”
I created an “image” (which is the “local” disk of our VM)
- 20 GB
- Virtio-SCSI
- on storage domain VMs
- thin provisioned
- disk profile: VMs
- bootable
I added a NIC for each network i wanted to test (all networks except live migration)
I started the VM with the “Run Once” button and conencted RHEL ISO image to boot from to the VM.
I clicked through the manual installation.
I added a static ip configuration to each network and checked connectivity by pinging the router of each network.
I’Ve done a couple of life migrations of the VMs (the Management VM as well as the test-VM) to other nodes to proof the migration works as expected without interrupting the VM itself.
Conclusion
We set up a 6 Node RHV cluster as you would typically run it in a datacenter. We’ve shared Fibre Channel Storage prepared for the VM-images and have different VLAN’s prepared for the VMs to attach to.
We also set up one VM to prove the deployment will work and tested networking as well as life migration.
For production use you should keep the firewall enabled and run more tests.
