
Overview
It happens from time to time that you have a couple of servers, may they be physical, virtual or only some cloud instances. These servers are able to communicate among each other on private networks and there is one host which has an public facing outside IP-Adress.
You would like to set up DNS, so that things just work.
I believe the situation i describe here will arise in many PoC environments, in Lab-environments but also in productive environments, where e.g. an Openshift, RH Virtualisation or any other platform – cluster might be hidden behind a couple of servers / IP-adresses.
I some cases the underlying (or surrounding) infrastructure does offer a DNS server, but often enough with limiting restrictions, which are hindering the functionality you’d like to achieve with your setup.
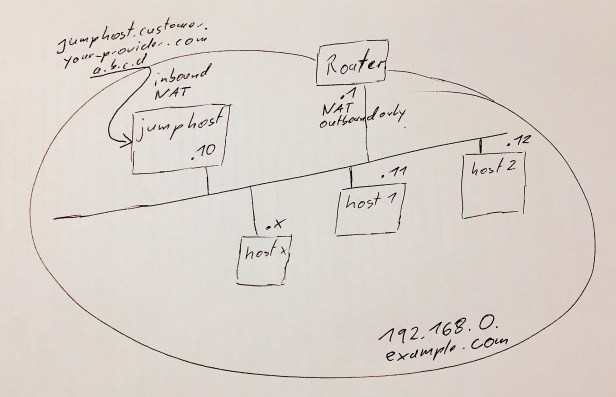
The setup in mind
Most often the problem is, that we do not exactly know what we can expect, what we need additionally and how the setup should look like. This makes it difficult to be set up.
To my experience, i’m often dealing with the following situation:
-
- We have a couple of hosts in a separated network. Hosts can reach each other.
- There is a router which enables the hosts to reach the outside world via nat (e.g. for SW updates / downloads).
- The hosts are not reachable (directly) from the outside. The just mentioned router only enables outbound connections.
- We have one host, which is part of our separated network and also has a public facing IP-Address. This host is reachable from the outside world (maybe via NAT). In the following i call this host jumphost.
- We do not need to bother about the IP-Adress or the public facing FQDN of the jumphost. The FQDN will be provided by some DNS-service outside our control (and delivered by our provider). We take this as granted and will not interfere.
- In some cases the IP (a.b.c.d in my picture) changes (while the FQDN stays constant).
- The hostname from within our network may differ from the externally reachable FQDN.
- Requests:
- The hostnames within our network shall be provided by our self setup DNS-Server. These names will only be resolved from within our network. This restriction is fine, as the hosts are only reachable from within our network anyway.
- The DNS name resolution with in our network shall also provide reverse lookups. In other words: to a provided IP-Adress our DNS-Server will reveal the corresponding Hostname.
- All hosts within our separated network will point their resolver to our own self provisioned DNS-Server
- This server will assure name resolution of any outside request, by asking other nameservers (e.g to allow SW updates from repositories outside our network).
Example setup
Up to now, i’d call my assumptions / requests / needs likely to be true for a great lot of environments. To make things easier to follow and more concrete, i will now offer some example IP-Adresses, an example network and some example hostnames.
| General Settings | |
|---|---|
| private Network | 192.168.2.0/24 |
| internal domain name | example.com |
| host to serve as DNS Server | jumphost |
List of Hosts, internal and external Hostnames:
| Hostname | Internal FQDN | Internal IP-Adress | External FQDN | External IP-Adress |
|---|---|---|---|---|
| router (to the outside world) | might not have a fqdn | 192.168.0.1 | – | – |
| jumphost | jumphost.example.com | 192.168.0.10 | jumphost.customer.your-provider.com | a.b.c.d may vary |
| host1 | host1.example.com | 192.168.0.11 | – | – |
| host2 | host2.example.com | 192.168.0.12 | – | – |
Prerequisites
In my scenarios all hosts are RHEL 7 hosts, fully subscribed with a current Red Hat Subscription. The hosts are registered to Red Hat content deliver network (or to a Satellite Server) and are able to fetch SW packages or updates from there.
Hint: There might be a chicken-egg issue, because for this to work the clients need to resolve external IP-Adresses. If we did not tamper to much with the provider provided configuration (which might come via dhcp), this should work in the first place.
If this does not work right from the start, you might already need to provide a self created /etc/resolv.conf temporarily on each host. The resolv.conf might look like this:
nameserver 8.8.8.8
domain example.com
Hint 2: You will need to assure that the resolv.conf stays in place (and gets not altered by dhcp-client or by NetworkManager).
Background on DNS
Names for DNS daemons
DNS stands for Domain Name System. So what you would want is a DNS-Server to provide this service. The most widely used implementation is provided by ISC and called bind, which stands for Berkley Internet Name Domain and now runs with mayor version 9 (bind 9). Older Versions (bind 8 or bind4) should not be used ay more. The main component of bind is the daemon, which is called named. All this gives you following names for more or less the same thing:
- DNS-Server
- bind (or bind 9)
- named
I will use all three names, depending on context and on my gut feeling.
Some comment on the structure of DNS
Forward resolution
DNS tree is built up hierarchically. There are a couple of root-nameservers who are well known and who have knowledge of the name servers for the TLDs (top level domains, like .com, .de, or .org). The Servers for certain TLDs have knowledge of the servers responsible for second level domains. This concept of delegation can be continued for each further domain level, but does not need to.
The servers, which are responsible for a certain domain are called authoritative (for this domain). All other (non authoritative) servers who need to resolve a name will forward their request most likely to the root-NS, which delegates them down to the TLD-NS, which delegates further down, till there is a server authoritative tor the FQDN in question. This NS will then answer with the requested IP-Address or (if this is not present) with a negative reply “NOT FOUND”.
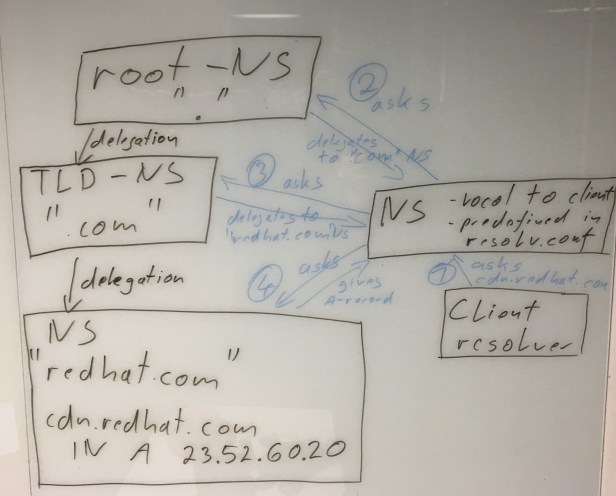
In the above picture you see the different roles:
- The client, which asks (1) a predefined (nearby) server and waits for the answer,
- The “local” NS, which recursively tries to resolve (2,3,4) the question till it finally gets an answer, which it then forwards to the client (step 5 not shown in the picture in favour to overview),
- and the authoritive NSs answering with a delegation, the requested information or with “NOT FOUND”.
Reverse Resolution
Now i need to introduce a hack to resolve IP-Adresses to Domain-Names. As you see in a domain name the most significant part is at the end (the TLD, far right). With an IP-Adress the most significant part is the first byte (far left).
To resolve IP-Adresses the IP-Adress gets reversed and put under a very well known DNS domain tree, in-addr.arpa. So for our class-C Network 192.168.0 the corresponding reverse domain is 0.168.192.in-addr.arpa.
This has been evolved to be also able to handle CIDR – which would mean that the border of the network does not match on a full byte. But we will not need this.
Tweaking this structure for our needs
For the purpose of our network we will need to be authoritative for example.com and for the reverse domain 0.168.192.in-addr.arpa.
We will tweak the DNS-Strukture as we do not have any delegation from official name servers to our private one. This will work well, as long as
- we assure the clients ask our name server directly (as it will not get delegated to it),
- we do not try to delegate parts of our domains further down, as delegation only works, when the complete chain from root-server to final domain is set up properly.
Installation & Configuration
Installing DNS Server SW
Installing DNS Server is easy:
[root@jumphost ~]# yum install bind bind-utils
This will bring the daemon, the config files and some client tools to test DNS.
Providing the zones file for Domain example.com
For each domain we want our server to be authoritative for we need to provide a domain file. This file starts with a SOA (start of authority) record with some general settings, true for this domain. We also need to provide a list of all nameservers authoritative for this domain (NS record). And as a third content we will provide the Address-Records (A records) for the hostnames we want to provide name resolution for.
[root@jumphost ~]# vi /var/named/db.example.com
$TTL 10800
@     IN    SOA   jumphost.example.com root.jumphost.example.com. (
                                      10 ;Serial
                                      86400 ;Refresh
                                      3600 ;Retry
                                      604800 ;Expire
                                      3600 ;Negative caching TTL
)

@     IN    NS    jumphost.example.com.

jumphost.example.com.   IN   A 192.168.0.10
host1.example.com.      IN   A 192.168.0.11
host2.example.com.      IN   A 192.168.0.12
host3.example.com.      IN   A 192.168.0.13
[root@jumphost ~]#
There are 2 things to watch out for in the file, which might not be obvious.
- The zone file is very picky on dots “.”. It is a big difference between “jumphost.example.com.” and “jumphost.example.com” – the later would give you a wrong record and result in nameresolution not working as expected.
- The serial number has relevance. It needs to be increased with every time you update the zone file (and before you sighup the server). Some people put the revers date of change as serial, but as long as it’s increased it does not matter.
Providing the reverse zones file for Subnet 192.168.0
We provide a SOA, at least one NS record for the reverse zone as well. Instead of A records we need to provide pointer records (PTR), which point to the name.
[root@jumphost ~]# cat /var/named/db.0.168.192.in-addr.arpa
$ORIGIN 0.168.192.in-addr.arpa.
$TTL 10800
@ IN SOA 0.168.192.in-addr.arpa. root.jumphost.example.com. (
        10      ;Serial
        86400   ;Refresh
        3600    ;Retry
        604800  ;Expire
        3600    ;Negative caching TTL
)

@ IN NS jumphost.example.com.

10    IN      PTR     jumphost.example.com.
11    IN      PTR     host1.example.com.
12    IN      PTR     host2.example.com.
13    IN      PTR     host3.example.com.
[root@jumphost ~]#
Creating name server configuration
some standard configuration
The main configuration file is /etc/named.conf. I leave this file mostly as it is and add the content relevant for the outlined scenario.
Being authorative for example.com and the 192.168.0 Subnet
The following two blocks define the nameserver to be authoritative for our domains. With the type “master” we also note that the zone file is created, changed, updated exactly on this host. “slave” nameservers would also be authoritative but fetch the zone-file form the master server.
zone "example.com" IN {
   type master;
   file "db.example.com";
   allow-update { none; };
};
zone "0.168.192.in-addr.arpa" IN {
   type master;
   file "db.0.168.192.in-addr.arpa";
   allow-update { none; };
};
Answering everything else as well
The client’s are allowed to ask queries, which the server can not answer itself. The server will try to resolve this instead of refering the client to a different server (recursion yes). But instead of doing recursive queries (starting at the root servers), we forward all queries to googles public available DNS servers (8.8.8.8 and 8.8.4.4). And we ask google to do all the work (forward only).
forwarders {8.8.8.8; 8.8.4.4; };
forward only;
recursion yes;
Assembling the peaces
The complete named.conf file looks like this (at least mine does) (left out some comments):
[root@jumphost ~]# cat /etc/named.conf

options {
   listen-on port 53 { any; };
   directory "/var/named";
   dump-file "/var/named/data/cache_dump.db";
   statistics-file "/var/named/data/named_stats.txt";
   memstatistics-file "/var/named/data/named_mem_stats.txt";
   allow-query     { 192.168.0.0/16; 127.0.0.1/32;  };
   dnssec-enable yes;
   dnssec-validation yes;
   forwarders {8.8.8.8; };
   forward only;
   recursion yes;
   bindkeys-file "/etc/named.iscdlv.key";
   managed-keys-directory "/var/named/dynamic";
   pid-file "/run/named/named.pid";
   session-keyfile "/run/named/session.key";
};

logging {
        channel default_debug {
                file "data/named.run";
                severity dynamic;
        };
};

zone "." IN {
   type hint;
   file "named.ca";
};

zone "example.com" IN {
   type master;
   file "db.example.com";
   allow-update { none; };
};
zone "0.168.192.in-addr.arpa" IN {
   type master;
   file "db.0.168.192.in-addr.arpa";
   allow-update { none; };
};
include "/etc/named.rfc1912.zones";
include "/etc/named.root.key";
Starting the nameserver
As any other service the nameservice is started and enabled for restart like this:
[root@jumphost ~]# systemctl start named
[root@jumphost ~]# systemctl enable named
Testing the nameserver-configuration
It is relevant that you check your name configuration throughout. Troubleshooting your platform misbehaviour is much more exhausting.
Assure your services started without failure:
run the following in a separate terminal while starting / restarting / checking your service:
[root@jumphost ~]# tail -f /var/log/messages
Now check by directly questioning your nameserver:
[root@jumphost ~]# dig +short @192.168.0.10 host1.example.com.
192.168.0.11

[root@jumphost ~]# dig NS +short @192.168.0.10 example.com
jumphost.host1.example.com.

[root@jumphost ~]# dig AXFR @192.168.0.10 example.com
; <<>> DiG 9.9.4-RedHat-9.9.4-61.el7 <<>> AXFR @192.168.0.10 example.com.
; (1 server found)
;; global options: +cmd
example.com. 10800 IN SOA jumphost.example.com. root.jumphost.example.com. 12 86400 3600 604800 3600
example.com. 10800 IN NS jumphost.example.com.
jumphost.example.com. 10800 IN A 192.168.0.10
hosts1.example.com. 10800 IN A 192.168.0.11
host2.example.com. 10800 IN A 192.168.0.12
host3.example.com. 10800 IN A 192.168.0.13
example.com. 10800 IN SOA jumphost.example.com. root.jumphost.example.com. 12 86400 3600 604800 3600
;; Query time: 1 msec
;; SERVER: 192.168.0.10#53(192.168.0.10)
;; WHEN: Mon Nov 19 14:25:21 CET 2018

;; XFR size: 11 records (messages 1, bytes 326)
Don’t hesitate to run more test-commands, till sure everything works smoothly.
Also check the reverse lookup:
[root@jumphost ~]# dig +short -x  192.168.0.11 @192.168.0.11
hosts1.example.com.
[root@jumphost ~]# dig NS +short  @192.168.0.10 0.168.192.in-addr.arpa.
jumphost.host1.example.com.
[root@control ~]# dig AXFR @192.168.0.10 0.168.192.in-addr.arpa.
; <<>> DiG 9.9.4-RedHat-9.9.4-61.el7 <<>> AXFR @192.168.0.10 0.168.192.in-addr.arpa.
; (1 server found)
;; global options: +cmd
0.168.192.in-addr.arpa.	10800	IN	SOA	0.168.192.in-addr.arpa. root.jumphost.example.com. 12 86400 3600 604800 3600
0.168.192.in-addr.arpa.	10800	IN	NS	jumphost.example.com.
10.0.168.192.in-addr.arpa. 10800 IN	PTR	jumphost.example.com.
11.0.168.192.in-addr.arpa. 10800 IN	PTR	host1.example.com.
12.0.168.192.in-addr.arpa. 10800 IN	PTR	host2.example.com.
13.0.168.192.in-addr.arpa. 10800 IN	PTR	host3.example.com.
0.168.192.in-addr.arpa.	10800	IN	SOA	0.168.192.in-addr.arpa. root.jumphost.example.com. 12 86400 3600 604800 3600
;; Query time: 1 msec
;; SERVER: 192.168.0.10#53(192.168.0.10)
;; WHEN: Mon Nov 19 14:41:42 CET 2018
;; XFR size: 11 records (messages 1, bytes 338)
To be sure names outside your network can also be resolved:
[root@control ~]# dig +short @192.168.0.10 www.redhat.com
ds-www.redhat.com.edgekey.net.
ds-www.redhat.com.edgekey.net.globalredir.akadns.net.
e3396.dscx.akamaiedge.net.
96.16.16.192
Changing something
If you find any issues in your name server configuration, you need to change the corresponding file. If you change something within the zone-files, please assure to also increase the serial number.
Send a sighub to your service to make the change effective:
[root@jumphost ~]# systemctl reload named
Configuring the clients
Configuring the clients – manually
After you assured your nameserver is running as expected, you need to configure the clients. In other words, you need to assure that on each host the resolv.conf points to your newly set up nameserver.
You will aim to have the following resolv.conf:
[root@host1 ~]# cat /etc/resolv.conf
search example.com
nameserver 192.168.0.10
Configuring the clients – via network manager
You can use network manager to control resolver configuration by adding it to your interface configuration file similar to the following:
[root@host1 ~]# cat /etc/sysconfig/network-scripts/ifcfg-eth0
BOOTPROTO=dhcp
DEVICE=eth0
HWADDR=xx:xx:xx:xx:xx:xx
ONBOOT=yes
TYPE=Ethernet
USERCTL=no
PROXY_METHOD=none
BROWSER_ONLY=no
DNS1=192.168.0.10
DOMAIN=example.com
DEFROUTE=yes
PEERDNS=no
IPV4_FAILURE_FATAL=yes
IPV6INIT=no
NAME="System eth0"
UUID=xxxxxxxx-xxxx-xxxx-xxxx-xxxxxxxxxxxx
[root@host1 ~]#
Configuring the clients – via dhcp
As a third option you could add the configuration. to your dhcp server so that the dhcp clients get informed about the dns configuration. This could be the following lines in dhcpd.conf.
option domain-name-servers 192.168.0.10;
option domain-name "example.com";
Testing
Now login to one of your clients and do some of the testing (again):
[root@host1 ~]# dig +short @192.168.0.10 host2.example.com.
192.168.0.12
[root@host1 ~]# dig +short host1.example.com.
192.168.0.11
[root@host1 ~]# host host2.example.com
host2.example.com has address 192.168.0.12
[root@host1 ~]# host host2
host2.example.com has address 192.168.0.12
[root@host1 ~]# ping host2
PING rhvh1.example.com (192.168.0.12) 56(84) bytes of data.
64 bytes from rhvh1.example.com (192.168.0.12): icmp_seq=1 ttl=64 time=0.876 ms
64 bytes from rhvh1.example.com (192.168.0.12): icmp_seq=2 ttl=64 time=0.534 ms
^C
--- host2.example.com ping statistics ---
5 packets transmitted, 5 received, 0% packet loss, time 4001ms
rtt min/avg/max/mdev = 0.439/0.570/0.876/0.160 ms
[root@host1 ~]# host 192.168.0.12
12.0.168.192.in-addr.arpa domain name pointer host2.example.com.
Also you would want to reach hosts on the outside world:
[root@host1 ~]#  host access.redhat.com
access.redhat.com is an alias for access.redhat.com.edgekey.net.
access.redhat.com.edgekey.net is an alias for e133.b.akamaiedge.net.
e133.b.akamaiedge.net has address 23.209.77.16

[root@host1 ~]# ping access.redhat.com
PING e133.b.akamaiedge.net (23.209.77.16) 56(84) bytes of data.
64 bytes from a23-209-77-16.deploy.static.akamaitechnologies.com (23.209.77.16): icmp_seq=1 ttl=55 time=32.5 ms
64 bytes from a23-209-77-16.deploy.static.akamaitechnologies.com (23.209.77.16): icmp_seq=2 ttl=55 time=32.6 ms
64 bytes from a23-209-77-16.deploy.static.akamaitechnologies.com (23.209.77.16): icmp_seq=3 ttl=55 time=32.6 ms
^C
--- e133.b.akamaiedge.net ping statistics ---
3 packets transmitted, 3 received, 0% packet loss, time 7012ms
rtt min/avg/max/mdev = 32.511/32.654/32.783/0.115 ms
[root@host1 ~]#
Conclusion
We now have all things at hand to get the underlying DNS up and running so we can concentrate on more interesting stuff on top of the hosts.
